What is a Teeth Whitening Shade Chart?
A teeth whitening shade chart is an essential tool used in the field of cosmetic dentistry and at-home teeth whitening. It’s a visual guide that helps both dental professionals and individuals assess and track the color of their teeth. These charts typically consist of a range of tooth shades, from the darkest, often yellowish or grayish hues, to the lightest, bright white shades. The chart enables a standardized method for evaluating the current color of the teeth (the baseline), monitoring the progress of whitening treatments, and communicating effectively about the desired outcome. The standardized shades eliminate ambiguity, allowing for clear communication between the dentist and the patient, or for self-assessment during at-home whitening.
The Purpose of a Teeth Whitening Shade Chart
The primary purpose of a teeth whitening shade chart is to provide a clear, objective reference for the color of teeth. This reference serves multiple important functions, starting with the initial assessment. Before any whitening treatment, whether in-office or at-home, the shade chart helps to establish a baseline. This baseline is critical; it allows both the dentist and the patient to understand the starting point. Furthermore, the shade chart facilitates tracking progress. Regular assessments using the chart will help to see visible changes. This ensures treatment effectiveness and allows adjustments. It also plays a role in managing expectations, as it can guide the patient toward realistic and achievable results based on their natural tooth shade and the whitening method chosen.
How Shade Charts are Used

Using a teeth whitening shade chart is straightforward but requires attention to detail for accuracy. The process usually begins with a dental professional or the individual comparing their teeth to the shades on the chart under proper lighting conditions, typically a neutral or daylight spectrum. The shade that most closely matches the color of the teeth is selected as the starting point. During the treatment, this process is repeated at regular intervals to monitor the progression of the whitening. The comparison should always be done in the same lighting conditions to avoid any discrepancies. Keeping the chart clean and handling it carefully are also crucial for maintaining its accuracy and usability.
Factors That Can Influence Shade Selection
Several factors can influence the selection of a shade using a teeth whitening chart. The type of lighting is particularly important; natural daylight or specialized dental lighting is the most reliable. Ambient light can skew the perception of color, leading to inaccurate assessments. The condition of the teeth also plays a role, as staining from food, drinks, and smoking can impact the original shade. The level of hydration in the teeth can affect their appearance; teeth can appear slightly lighter when fully hydrated. Existing dental work, such as fillings or veneers, must also be considered, as they may not whiten in the same way as natural teeth. These factors highlight the need for a controlled environment and careful observation when using a shade chart.
Top 5 Facts about Teeth Whitening Shade Charts
Fact 1 Baseline and Progress Monitoring

The first fact is the fundamental role of shade charts in establishing a baseline and monitoring progress. Before any whitening treatment, a shade chart helps to identify the existing color of the teeth, providing a clear starting point. This initial assessment allows for the tracking of the progress. By comparing the teeth to the chart at regular intervals, individuals or professionals can see how effective the whitening treatment is and make any necessary adjustments. This ensures that the treatment is on track and gives a tangible measure of success, making it easier to evaluate the results and maintain motivation throughout the whitening process.
Fact 2 Diverse Shade Options
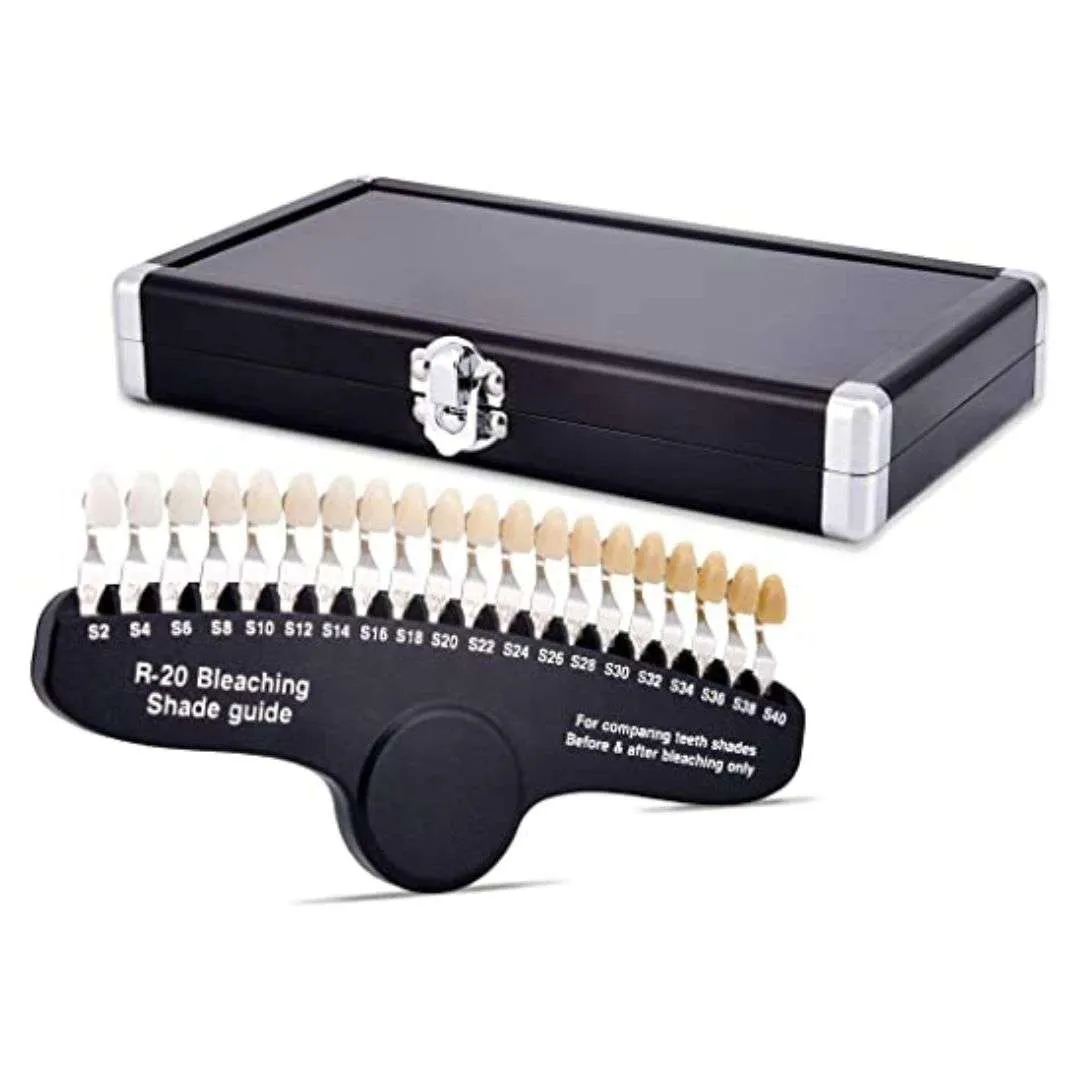
Shade charts offer a wide range of options, each represented by a specific number or letter, to accommodate a spectrum of tooth colors. These charts usually begin with darker shades, ranging from yellowish to grayish hues, and progress through various levels of brightness. The variety of options helps to ensure that individuals can find a close match to their existing tooth color. This diversity ensures that both professional and at-home treatments can be tailored to individual needs and desired outcomes. The ability to select from multiple shades also helps in setting realistic expectations. It provides a tangible representation of what can be achieved with teeth whitening treatments, from subtle enhancements to dramatic transformations.
Fact 3 Professional vs. At-Home Kits
Both professional dental treatments and at-home whitening kits utilize shade charts, although their application and the products used may differ. In a dental office, a dentist uses a chart to assess the current shade and to monitor progress during in-office whitening sessions. They may also use the chart to help patients choose a shade for veneers or other cosmetic procedures. At-home kits include shade charts to help users track their whitening progress, but the results and methods used are usually less potent than those available professionally. Understanding these differences is crucial in managing expectations and choosing the most suitable teeth whitening option. The chart remains a constant, providing a visual benchmark for evaluating the impact of each approach.
Fact 4 Expectations and Limitations

Teeth whitening shade charts play a vital role in setting realistic expectations. They can demonstrate the range of achievable results based on an individual’s initial tooth shade and the selected whitening method. They also help to manage potential limitations; certain types of stains or intrinsic tooth discoloration may be more resistant to whitening than others. The chart helps set boundaries, ensuring that individuals understand that while significant improvement is often possible, achieving an unrealistic or unattainable shade isn’t always feasible. This transparency contributes to a more satisfying experience. By guiding patients towards realistic goals, the chart helps to prevent disappointment and enhances the overall satisfaction with the whitening outcome.
Fact 5 Long-Term Maintenance
The final fact highlights the importance of long-term maintenance in preserving the results achieved through teeth whitening. After completing a whitening treatment, using a shade chart can help to monitor any gradual changes in tooth color over time. Regular use of the chart enables individuals to identify when touch-up treatments might be necessary to maintain their desired shade. Moreover, the chart can motivate patients to adopt good oral hygiene habits. These habits include regular brushing, flossing, and professional dental cleanings, as these are essential to prevent new stains from forming. The ongoing use of the chart supports both the immediate aesthetic goal of teeth whitening and the long-term maintenance of a healthy, bright smile.
How to Use a Teeth Whitening Shade Chart
Understanding the Shade Chart Scale

Teeth whitening shade charts typically use a scale, often with letters and numbers, to represent different shades. The scale usually starts with the darkest shades, such as A4 or B4, and progresses towards the lightest shades, like A1 or B1. These letters and numbers are standardized across many dental practices and home kits, which allows for easy comparisons. The specific shade system (e.g., VITA Classical or others) is used to organize and differentiate the colors. Understanding the scale is important for accurately interpreting your current shade and tracking your progress. Familiarizing yourself with the chart’s structure and the meaning of each designation allows you to make well-informed decisions and track the effectiveness of your whitening treatment effectively.
Matching Your Current Shade
Matching your current tooth shade is the initial step in using a whitening shade chart. This process should be performed under good lighting. Hold the chart close to your teeth and compare the shades until you find the one that most closely matches. Be sure to look at your teeth from different angles to confirm the match. When making this comparison, ensure your teeth are clean. In addition to your existing teeth, take into account any fillings, crowns, or veneers that might not respond to the whitening process in the same way. The careful matching of your current shade provides a solid basis for assessing the effectiveness of your whitening treatment and establishing realistic expectations for your final results.
Tracking Your Whitening Progress
Tracking your whitening progress involves regularly comparing your teeth to the shade chart throughout the treatment period. Usually, the comparison should be made at the same time each day or week, following the instructions of your dentist or the product manufacturer. Use the same lighting conditions each time to avoid any discrepancies in your assessment. Each comparison will help you assess how much your teeth have lightened. Keep a record of your shade changes to track how your teeth have whitened. This record offers a visual representation of the results. This tracking process is crucial for maintaining motivation and helping you achieve your desired shade effectively and efficiently.